 Transcribe!
 A great tool for studying, practicing, and transcribing music
If I'd only had an app like Transcribe! when I was first learning music. With Transcribe! you can play any section of a recording, at any speed, in any key. You can repeat any selected section in a smooth continuous loop, and you can easily mark sections and measures to create a clear study guide. These features provide lots of chances to relax, listen, learn and refine, and for many people this is exactly what helps them get to the next level of musicianship, particularly with respect to self-guided study, learning by ear and memorization.
Of the various apps that slow music Transcribe is my pick for laptop and desktop environments. Currently it is not available for mobile devices. So I've written this rather extensive article on the topic. And you can get a free 30-day trial of Transcribe from the author's site by clicking this link.
Transcribe! is extremely helpful for musicians of all levels, beginning through expert. It's a favorite tool of performers, music instructors, and amateur musicians who simply play for pleasure, but please be clear, Transcribe! is a truly great tool, and though it can be extraordinarily helpful for beginners it's not simply a crutch for newbies.
Note: Transcribe! is officially spelled with an exclamation point, as shown in bold at the beginning of this sentence. However for clarity I'll drop that character through the remainder of this article and refer to the software as 'Transcribe'.
Additional note: Transcribe is not just for transcribing music, nor does it actually transcribe music automatically, however it is very useful for all kinds of practice.
Transcribe allows you to create simple study guides, and you can use very detailed guide created by a colleague or your music instructor. These guides make it easy to play along the great recordings, so you can refine and perfect, practice memorizing. Transcribe also allows you to learn by ear or practice improvising in a "controlled environment."
Most musicians use Transcribe! primarily to slow down music playback. Slowing playback allows you to perceive details more accurately. When you hear details clearly, and when you're not struggling to keep up, your goal is more readily attainable so improvement and enjoyment naturally follow. That's why Transcribe is so popular. Practically everyone learning by ear wants an app that slows down music, and this basic feature is available simply by dragging a speed slider. Doesn't get simpler than that.
A great tool for practicing music, memorizing and learning by ear.
Transcribe is useful in learning by ear, memorization, improvisation, other musical recreation, plus the creation of music study guides and guided practice. So if you're heading down any of these paths do check out Transcribe! Transcribe is particularly tailored to the needs of musicians who want to learn music by ear and memorize. And as its name implies it's an extremely helpful tool that simplifies the process of writing notation for songs learned by ear. Though musicians are Transcribe's target market, Transcribe is helpful to people in other fields, such as language teachers and students, or people who do voice transcription, because they need many of the features described above.
Alternative apps
There are a number of excellent competitive apps available for Windows, Mac OS and mobile devices. And like Transcribe the prices are roughly $40 or less, like Transcribe. Beyond commercial apps there are a number of options.
There are some options in youTube for changing playback speed in youTube videos, however the audio quality isn't great and the choices of speed are limited ... but it's certainly handy in a pinch!
And even QuickTime and Windows Media Player (both free) can control of playback speed of soundfiles, CD tracks, and even videos.
Despite the number of available apps I like Transcribe the best. By far! Primarily because Transcribe allows users to add section marks, measure marks, and even beat marks. And it allows music teachers to create study guides and share them with their students—the student just needs their own copy of the soundfile, a copy of the Transcribe study guide, and a moment of time to pair the Transcribe to the sound file.
A well constructed study guide facilitates focused study by allowing you to quickly select the section you want to practice; you'll spend more time playing and less time trying to find your place Having looked at some alternatives, let's delve into Transcribe.
The origin of this Transcribe tutorial
This article began as a brief introduction to Transcribe. The original purpose was threefold:
- to help my music students understand how to install and launch Transcribe
- to teach them to use Transcribe effectively
- to explain how to download and use the various resources I've created for Transcribe.
- to explain how to used shared Transcribe files (i.e. pairing the Transcribe file with a sound file)
After I began witnessing dramatic improvements in students who used Transcribe I adapted the original article to speak to a larger audience, including music educators and those involved in various avenues of music study. So here it is online.
Highly recommended, and here's why
I recommend Transcribe to all my music students and fellow musicians. It's unparalleled for learning by ear, for jamming with recordings, and indeed it's the best tool I've found for transcribing music.
In brief, Transcribe allows you to:
- Change the speed of audio recordings and videos. Transcribe allows you to pick a comfortable practice speed. You can practice along with the world's great recordings even if you can't keep up with the original tempo. Just choose a comfortable speed and play along at that tempo until you're ready to go faster. This feature alone is extraordinarily useful. Slowing recordings greatly simplifies the task of learning by ear. It's helpful whether you're practicing with written music or if you're learning by ear.
- 'Tune' any recording or video to your instrument. What? Professional recordings are out of tune? Yes, indeed many of them are. I regularly come across professional recordings—especially older ones—or field recordings, where the pitch is not true. Granted, I could just tune my instrument to the recording, but that's a task I'd rather avoid, particularly when my instrument is perfectly in tune. It's much easier to tune Transcribe to my instrument. My transcribe study guides (.xsc files) will include any necessary pitch correction adjustment.
- Mark sections of a recording and play those sections in loops. Transcribe makes it easy to mark large sections like an introduction, verse, chorus or solo. But you can mark
in great detail if you want, marking measures, and even beats. Aside from speed and pitch control, I think markers are Transcribe's greatest feature. They are easy to create, move, and rename.
NOTE: I stopped using Amazing Slow Downer (by Roni Music) mainly because it lacks a flexible, intelligent, graphical way of adding markers. Markers let you move around quickly from section to section, and allow you to easily resume work on a piece, days, weeks or months later. You can instantly find your place, so you can finish your working on a piece. I often use markers to review and proofread my transcriptions ... from a more objective perspective, out of the heat of the initial transcribing moment. - Save your Transcribe markers and settings. When you save a Transcribe file the markers you created are stored in a Transcribe file, along with settings like speed and pitch. The resulting Transcribe files are VERY small documents (usually just 4 to 8kin size!). This is where Transcribe really shines. The Amazing Slow Downer has a stunted ability for creating, editing and saving markers, therefore it is really limited as a tool for guided study.
- Share your Transcribe with other musicians. Because Transcribe files are so small you can email (as attachments) to other musicians. A Transcribe file contains no audio, so a person using a shared transcribe file must have the same soundfile on their computer, and they must locate this file for Transcribe. This involves a simple process called "pairing files.'
- Serious users can connect a foot pedal for hands free operation.
That's Transcribe in a nutshell. The remainder of this article is an introduction to some of the resources I've created for Transcribe, and a deeper look at Transcribe itself.
What Transcribe does NOT do
Before further describing Transcribe's many virtues I should dispel a likely misconception. Transcribe's name strongly implies that it can automatically transcribe music, in other words, that it can "listen" to an audio recording and create music notation for it. Many of us would welcome a program capable of that feat, but Transcribe does NOT automatically transcribe or notate music recordings. Only a few products even attempt to transform audio to written notation or MIDI, and these produce reasonable results ONLY when working with monophonic recordings, recordings of an individual instrument or a vocal solo (and even then the timing and pitch of the recording has to be near perfect. So, for any practical purpose, there is not yet any software that can automatically generate transcriptions of melodies or chords. However there is one little hint of automatic transcription, explained here.
Nevertheless, if plan to to transcribe music manually, or if you want to learn music by ear without writing it out, Transcribe is invaluable tool and a pleasure to use. Transcribe will help you zero in and focus, it will allow you to slow down music, and to correct the pitch if need be. But you're the one who will do all the transcribing. Figuring out the notes and fingerings is entirely up to you, your ear, and your perseverance.
Even if you have no interest in transcribing music, Transcribe is probably an excellent tool for your musically growth. Ultimately, Transcribe's best purpose and continuing popularity will likely center around its usefulness in providing study guides for musicians working toward mastering a piece of music.
Free 30-day Trial
You can download a free 30-trial of Transcribe and give Transcribe a full-featured whirl. During the trial period Transcribe is fully operational: you can create and save Transcribe files; no features are disabled. When you're convinced Transcribe is worthwhile, and you've determined that operates on your computer without problem, you can buy Transcribe and become a registered user. (For the record, after yeas of use, I've never had Transcribe crash.)
Each time you launch Transcribe during its trial period, it offers you an opportunity to purchase it. With a single click you can dismiss the sales pitch and continue using the trial version ... or you can go ahead and register.
After the 30-day trial period has expired, Transcribe will no longer operate when you launch it, except that it will continue to offer you an opportunity to purchase. If you choose to purchase Transcribe through its internal mechanism, or through the links on this page, you will received a registration number via email. Once you receive the registration number, copy and paste it into Transcribe's registration field. This transforms the trial version to a fully unlocked and registered version. There's nothing else to download or buy.
Transcribe includes a detailed users guide, accessible from its Help menu. You can find helpful information online at SeventhString.com, the developer's site.
Purpose of this article
I've written this article specifically to introduce Transcribe resources that I've created, which should prove useful to for anyone using Transcribe:
- a set of keyboard commands that will help you navigate quickly through Transcribe files
- Transcribe tips, tricks, and tutorials
- a library of Transcribe files that you can use to study music
- a music education network and community, including links to other Transcribe resources.
Before I cover these topics, here's an deeper look at Transcribe.
Transcribe 'slow down' software is loaded with useful features!
Over the years I've used many methods for slowing music. My main purpose in slowing it down? To make it easier to play along with fast tempo recordings, and to work at a comfortable pace when learning music by ear. (Way back I used turntables, then cassette recorders, even Minidisc players. Click for a brief history of transcription devices ... one that underscores the value of Transcribe.)
A brief history of slow down software
Around 1999 various music software utilities began to appear that allowed musicians to control playback speed of recording. Suddenly there was no more reason to buy expensive, awkward, analog equipment for the task, which was great news for me, because under heavy use, my expensive tape players lasted but a few years each.
Now the average person with a Mac or PC could change the speed of a recording with a $50 piece of software. Additionally they could change speed without changing the pitch. That was a huge improvement that old analog equipment which never provided such a feature. Such a feature was previously available in audio editing tools, but there were drawbacks. These editing tools cost hundreds or thousands of dollars, the pitch/speed filters were slow, and the transformations took up lots of hard disk space. Expensive, confusing and cumbersome, they weren't for the average person.
As of the spring of 2009, the cost for either Transcribe or Slow Downer is a modest $50.
The Amazing Slow Downer
I used the Amazing Slow Downer for many years, and was fairly satisfied with it. It's good software, but in recent years the Amazing Slow Downer hasn't gained many meaningful features. Currently it works only with audio recordings, it doesn't yet work with video, it still has extremely limited options for creating and saving loops: it provides only numeric controls for setting loops points (i.e. it has no soundwave graphical interface) so creating loops is awkward and time consuming, there's no convenient way to share loops, and if you're transcribe preference file gets damaged you'll loose all un-exported loops.
Transcribe — Best in its field!
After switching to Transcribe from the Amazing Slow Downer I've never looked back.
Transcribe has many features I find lacking in the Amazing Slow Downer. In particular Transcribe has a graphical 'soundwave' interface. This is extremely helpful if you want to mark measures or sections of music. It's equally helpful for selecting a measure or section to study and play it in a loop.
In addition to working with audio files, Transcribe works with video files, like MP4 or .mov files. When you slow down music, you can see the video in slow motion too.
Transcribe feature overview
Like other music study software, Transcribe offers a few essential tools:
- variable speed control (which does not affect pitch)
- variable pitch control (which does not affect speed)
- loop control (this is where Transcribe really shines above the competition!)
Variable-speed allows you to slow the tempo of the music to a comfortable speed. It's like inspecting audio with a microscope: magnifying and illuminating details otherwise unobservable. Transcribe also works with video formats like mpeg and .mov
Variable pitch allows you to tune a recording to your instrument. This is a real time saver when the recording or your instrument is out of tune.
Loop control allows you to focus on sections of music, large or small.
Transcribe allows musicians and music teachers to mark out sections and measures for any audio recording or video, and they can easily share these transcribe files with others who have purchased that recording.
Click to read an overview of Transcribe's features (in the author's own words)
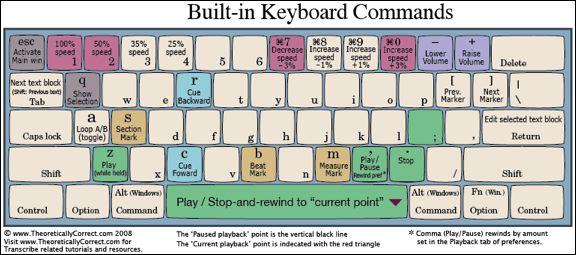
Here's a chart of Transcribe's built-in keyboard commands. Click the image for a PDF:
In another section I'll introduce you to keyboard commands that I've created for Transcribe.
Understanding Transcribe files
Here are a few essential facts to understand about Transcribe and Transcribe files.
- Transcribe files are not audio sound files. Audio sound files are very large, usually 3 to 30 MB.
- A Transcribe file is a very small text file (usually just 4 to 12K.)
- The extension of a Transcribe file is .xsc (More detailed explanation just ahead in items 6 through 10.)
- A Transcribe file looks like an audio file, because it displays a wave form image of your soundfile. It does so to enable you to navigate through the soundfile, to allow you to make selections or mark section (which you can play in loops), and to provide feedback on the location of markers that you add or edit.
- Transcribe does not alter your audio sound files in any way, so it's impossible to harm or inadvertently alter them with Transcribe. (Transcribe can alter a soundfile's speed and pitch temporarily, so it may seem like you're changing your sound file, but Transcribe accomplishes this without ever affecting the original soundfile.)
- When studying a piece of music with Transcribe you'll benefit from marking various sections, correcting pitch, etc. You can save these efforts or not. In other words, you can use Transcribe without saving your work, but then you're starting from scratch each time you return to study the piece. If you choose to save your work Transcribe stores it a Transcribe file, which you can later open and edit ... and your can share it with other transcribe users.
- A Transcribe file may be very simple or extremely detailed. Each Transcribe file may contain various type of markers, annotation, and other settings like speed and pitch:
- A Transcribe file may contain only pitch correction. This is helpful in the future, so you can play along without having to retune your instrument each time (or conversely, so you won't have to figure out how to retune the recording to correct it's pitch discrepancy.)
- A Transcribe file may contain only a minimum number of markers, for instance, just for the beginning of each verse and chorus. This along can be extremely helpful to someone studying a song. Alternately a Transcribe file can be very detailed.
- A Transcribe file may contain markers for every section, measure ... even every beat! Simultaneously it can show section markers and it can retain pitch and speed settings as well.
- Each Transcribe file simply points to and 'pairs' with a particular soundfile.
- Although each Transcribe file faithfully remembers this 'paired' association, certain actions on your part can break the association .For instance, if you rename the sound file, if you move it to a new location or rename a containing folder ... or if you use a Transcribe file that was created on altered on another computer.
- If a Transcribe file looses track of it's associated sound file, you can fix that quite easily, by repairing the soundfile association.
- For a given music project sometimes it's helpful to have a number of points of view ... or different levels of detail. This is easy with Transcribe. You can create multiple Transcribe files that point to a single audio file. For instance, variations or edits of existing Transcribe files, or new files that you create from scratch. for a
Transcribe can play any marked or selected section in a loop for detailed study. Transcribe files may also include subtle pitch correction, which makes an 'out of tune' recording play in tune!
You can also use Transcribe to control audio playback without ever creating a Transcribe file. You can just set up a workspace on the fly. But if you go to the trouble of creating markers, or adjusting the pitch to bring the recording in tune, you might as well save your work. The files are tiny, you can use them again, and you can share them with other musicians who have the same recordings.
What musicians do with Transcribe
People use Transcribe differently depending on their purposes. In the next section I'll describe the features most everyone will use. Afterwards I'll explain how you're likely to use Transcribe if you play for fun and recreation, if you're a music student, if you're a music teacher, a performer or scholar, or a transcriptionist. I plan to include a few video tutorial screencasts here in coming months... in the meantime, here are words to describe.
If you want to dive right in and start using Transcribe, you can skip this section and jump ahead to the section on installing keystrokes and using transcribe. And you can download the 30-day free trial version of Transcribe, or purchase Transcribe.
Playing along and learning by ear
I know lots of musicians who use Transcribe, but rather than using it to transcribe (i.e. notate music), most of them simply Transcribe it to play along with recordings, to fine tune their chops and timing, to practice improvisation, or to learn music by ear. Mainly I know people who use Transcribe to learn by ear, because they can slow the music down, mark sections, and play sections in loops.
Transcribing Music
Transcribe's name implies that it's main purpose centers around music transcription: the art of listening to music and notating it. Oddly Transcribe doesn't transcribe music. (Well, in one small way it does. Transcribe has a spectral analysis feature which can usually identify a single note or chord. But Transcribe doesn't automatically generate music notation of melodies, scores or chord progressions. Click to learn more about transcribing music.)
Even though Transcribe does not automatically analyze music and create music notation, it's a remarkable tool for musicians like myself who undertake that task. Presently I recommend Transcribe as the best tool for transcribing.
Adjusting variable-speed playback
Speed control is one of Transcribe's simplest features. It's helpful when you want to play along with a recording but the tempo is too fast. Reducing the speed is especially helpful when learning by ear or playing along, because you can slow the music to a comfortable learning pace where you can readily hear the details and play along without scrambling. Later you can challenge yourself by incrementally increasing the tempo and playing along, until you can comfortably play at full speed.
Adjusting variable-pitch
You can use Transcribe's pitch control to change the key of any recording.
It's also helpful when your instrument pitch of your instrument fails to match the pitch of a recording. A pitch disparity between your instrument and a recording will stem from one of two conditions:
- Your instrument may be slightly sharp or flat
- The recording might be slightly off key
- or perhaps there a combination of the two, and out of tune recording and instrument.
Whatever the case, Transcribe allows you to fine tune the pitch of the recording, by half-steps and cents (hundredths of a half-step.)
With polyphonic instruments like piano, guitar, harp, violin (any instrument that can play more than one sound at a time) the strings may be in perfect harmony to each other, so in it's own world your instrument sounds fine, but actually it's slightly sharp or flat, and thus out of tune with a correctly pitched recording.
In the case of a harp or 12-string guitar, retuning is such a chore, laziness may not be the prime factor, the driving force may be the desire to retain sanity! And it's simply not practical to retune a piano. Even on a in instrument that's relatively simple to tune, when it's well-tuned to itself, I like to leave it alone.
Transcribe is a worthy tool even if you only use Transcribe for speed and pitch control.
Loops and Markers: Sections, Measures and Beats
Although anyone can create their own Transcribe files, first you might want to explore using Transcribe with existing Transcribe files. Creating an accurate, detailed Transcribe file is sizeable yet attainable task, click here to read more about creating Transcribe files.
Using Transcribe with your existing library of recordings
Transcribe works with a number of audio formats and one video format, including anything that you've imported from CDs. There are audio formats which it does not support. Here's a brief list:
- Transcribe works with CDs, mp3, m4a/mp4 & AAC audio formats ... but not with M4p, which is a protected format, usually a purchase from Apple’s music store.
- Transcribe also works with .mov videos, and mp4 videos ... which are the same as m4a, but with video data.
- As mentioned, Transcribe does NOT work with m4p protected audio. (It’s easy to confuse the names mp4 and m4p!) And there are several audio formats that Transcribe does not support: WMA, Ogg Vorbis ... However you can find software to convert audio from one format to another, as long as the audio file is free from DRM protection.
- Transcribe also works directly with CDs and video DVDs, but you may experience better performance if you import or rip the files from those types of media, so they reside on your hard drive.
Sharing Transcribe files / Creating a Transcribe community
Transcribe users can share their Transcribe files, and offer them to others as study guides.
A well constructed Transcribe file is a great tool for practicing music: for leaning by ear, for improvisation practice, for general practice, and as an guide to the structure of a tune. There's no better way to hear and imitate the nuances of timing and expression. You can isolate premarked sections of a soundfile, at any speed. You can practice along with music or by heart.
A Transcribe file may have an extensive set of markers that indicate measures and sections in the soundfile. You can use those markers, you can refine them to improve the Transcribe file ... or you can radically change markers to make the Transcribe file better suit your intended purposes.
A Transcribe file may even have pitch correction settings that make an 'out of tune' recording play back correctly on key. Many recordings are out of tune, and if someone has accurately fixed the pitch, you won't have to try to figure out how to so so.
Markers, pitch correction ... beats starting from scratch! If you've created a useful Transcribe file, why not share it?
Transcribe files, are VERY small (usually just 4 to 12K) so they're are easy to email, download and archive. So they're easily shared with other musicians. That's the purpose of my small but growing library (online soon).
There's one tiny problem with using shared Transcribe files. The next section explains what that is and how to resolve it.
Using Shared Transcribe Files /Pairing a soundfile to a Transcribe file
You'll usually encounter a small annoyance whenever you first open a shared Transcribe file (in other words, when you open a Transcribe file that was created or edited on someone else's computer.) Transcribe will invariably post an ugly alert message reporting that it can't find the soundfile.
Fortunately, Transcribe simultaneously offers you an opportunity to locate the soundfile. Doing so is really quite simple. You can jump ahead if you want to find out why this problem occurs, but without delving into the underlying causes, here's the quick solution:
In Transcribe perform the following steps:
- Choose File/ImportSoundFile
- Locate the sound file on your computer (via the dialog's search tool — that's the easy way — or by navigating the various levels of folders on your hard drive.)
- Select the sound file
- Press OK
- Then immediately save the file (File>Save) This causes Transcribe to remember the pairing that you've just established.)
Performing the steps 1 through 4 will successfully pair the Transcribe file with the companion sound file, and you can begin working. However, this pairing is temporary—and it lasts only until you quit Transcribe.
If you close the Transcribe file without saving (step 5 above) Transcribe won't remember where the soundfile is located ... and the next time you use the Transcribe file you'll have to relocate the soundfile. Obviously you won't want to repeat this process every time you use the Transcribe file.
To imprint a permanent record of the file's location you must save the Transcribe file with File>Save. This updates your copy of the Transcribe file (so it permanently knows where the soundfile is located on your computer.) If you don't save the Transcribe file you'll have to go through the entire process again the next time you want to use the Transcribe file. So after you locate the soundfile be sure to save.
Saving is advised for the specific purpose of pairing. However, you should be rather cautious about saving Transcribe files in general. If you made any unintentional changes to the markers, pitch, speed, view settings, etc., Transcribe will save those. And it's is possible to accidentally drag markers off their intended position—saving will make those changes permanent. So just save once initially, to permanently save the sound file pairing. (Alternately, if you've intentionally made changes you want to save, and you're sure you haven't introduced any unintended changes, save the file.)
One more thing: Transcribe files contain no audio. They simply refer to and manipulate an existing sound file. You must have your own copy of the soundfile to which the Transcribe file refers. If you don't have your own copy of the sound file, Transcribe honestly won't be able to locate it until you buy a copy from an online store or import a copy from a CD.
Why can't Transcribe locate the soundfile?
For those interested, here's a short description that explains why Transcribe sometimes can't find a soundfile ...
Each Transcribe file contains a description of the location of the associated sound. For simplicity, I'll refer to the sound file's address as a 'pointer' to the soundfile. (The formal name for the soundfile 'pointer' is a 'hard drive directory path' or 'local URL' .)
Every Transcribe file contains as single soundfile pointer. This stores the location of the soundfile. Specifically it's a 'snapshot' that describes where the soundfile resided at that moment the Transcribe was created on edited ... on that computer!
When you copy or download a Transcribe file to your computer, the pointer inside the Transcribe file contains an address for a location on somebody else's computer! This makes no sense to Transcribe, and it immediately reports the problem. (I know, Transcribe should be smart enough to determine or guess the location of your sound file ... but it isn't. And this tiny problem will occur whenever you first open a shared Transcribe file.) When this situation arises, it's not because you've done something wrong. It's just a small shortcoming of Transcribe.
Fortunately the problem is easy to fix. If you've read this entire section, I recommend reviewing the beginning portion and study the steps for resetting the soundfile pointer.
Also note: it's possible to pair a Transcribe file the the wrong soundfile! If that occurs, you can remedy the situation using the same steps to pair the Transcribe file to the correct soundfile.
If you want to know more details, or want a much deeper look at the underlying causes and solutions, read more about paring Transcribe files to audio recordings ...
My Transcribe resources
I've created a small library of Transcribe resources. So far this includes custom keystrokes. The Transcribe files (.xsc files) are soon to come!
This section explains how to install the custom keystrokes. These keystrokes provide excellent ways of navigating through the markers for your recording.
Gathering resources for using a shared file
To use my Transcribe resources you'll need to:
- Obtain an exact duplicate of the audio recording. You can get an "exact duplicate" by purchasing and downloading the recording from Amazon or from another online store that provides MP3s. (Sorry, iTunes purchases won't work with Transcribe, unless you burn them to CD and them re-import them.) Alternately you can import the recording onto you computer from a commercial CD.
NOTE: Some albums have re-mastered recordings. This is not a problem unless the silence before the song differs. If does differ, then the Transcribe markers file (.xsc) will be out of sync. The problem can be fixed, it it requires a transformation of the .xsc file. This would be a rare situation, and I'm working on a converter.)
- Obtain the relevant Transcribe file. You can get Transcribe files from me, or from anyone who is willing to share them.
- Install my custom keystrokes. These are navigation and 'loop control' tools that allow you to operate Transcribe more efficiently. The next section entitled "Transcribe Custom Keystrokes" explains their purpose, and how to acquire and install them
Transcribe Custom Keystrokes
I've created custom keystrokes to use with Transcribe. They're helpful because they make it easy to:
- select sections (between markers)
- jump from section to section
- select multiple sections
- increase or decrease the size of a selection (number of measures)
- play section(s) in a loop
You don't need to use my custom keystrokes, but they provide a simple consistent way to navigate through an audio recording, selecting measures or other sections of music.
Here are instructions for installing my custom keystrokes and using them in everyday practice.
Importing the Custom Keystrokes for Transcribe!
Before you can use my keystrokes you must complete two simple of steps:
- FIRST: Download my Keyboard Commands keystroke file:
Click here to download a .zip file containing the keystrokes
Right-click this link AND choose the Save or Download option.
Either approach should download a text file. If you open it you'll see 'scary looking' contents like this:
The downloaded the KeyboardCommands file will have a name like 'KeyboardCommandsTC05.txt' or 'KeyboardCommandsTC08.txt' (Don't worry if the digits are higher. If you download a file with higher digits, use it. A higher number indicates a later release.)
When prompted, save the file to a memorable location on your computer. Make note of the folder you choose, because you'll need to navigate to it when importing the keystrokes. (You can create a folder for storing your Transcribe files and save the keystrokes file there.)
SECOND: Importing my keystroke file into Transcribe is a three-step process:
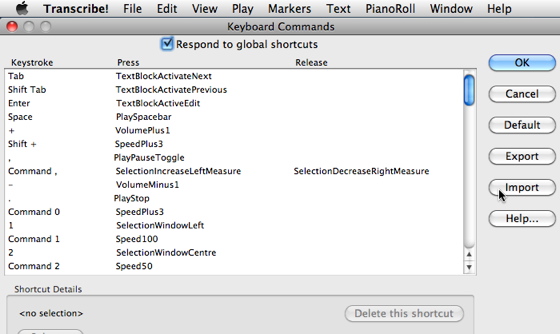
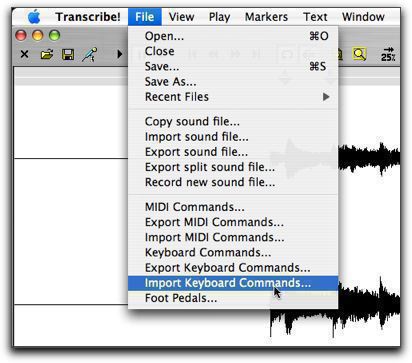
1) In Transcribe, select File>Import Keyboard Commands.
On the Macintosh the screen looks like this (and it's quite similar on Windows):
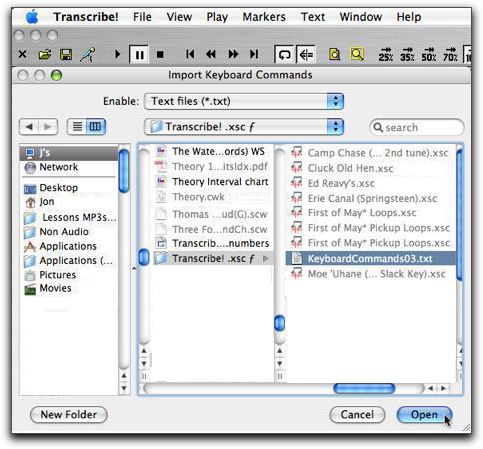
2) Then, in the window that opens, click the Import button:
3) After the ‘Import Keyboard Commands’ window opens (shown below) perform the following steps:
- Navigate to find the just-downloaded KeyboardCommands file on you computer (it will be where you saved the attachment, possibly in your downloads folder!)
- Select the KeyboardCommands file
- Click Open
NOTE: In earlier versions of Transcribe the import option appeared in the file menu:
If you have trouble locating the keystroke file, try entering the initial part of its name in the ‘search’ field located in the upper right quadrant of the illustration above. (As mentioned, the name of the file may change from time to time, but it always starts with "KeyboardCommands" or "KeyboardCommandsTC." As of 1013 it was named KeyboardCommandsTC07.txt)
After you've selected the"KeyboardCommands" file and press 'open', Transcribe will import the keycommands it contains. It will then post a message confirming that you've sucessfully imported over 70 keyboard commands. That measn import is complete and ready to start using the keycommand in Transcribe. To understand their purpose read the instructions in the next section.
Just a couple more points.
Once you've completed the import you can delete the "KeyboardCommandsTC07.txt" file from your hard drive. However, the file is very small, and you may wish to keep on hand in case you need to reimport the custom keystrokes. And you can always get the latest revision from this web pages.
Note: The keystrokes I created for Transcribe do not conflict with any Transcribe’s normal keystrokes, nor do they interfere with keystrokes that serve a special reserved purposes in your operating system, like Command C for copy. They are in effect only when running Transcribe, and only when it is the active, front most application.
Using Custom Keyboard commands with Transcribe
If you've successfully imported my custom keyboard commands, Transcribe now has several new keyboard commands available ... and you’re ready to proceed. If you haven’t yet imported the keystrokes, please refer to the section above.
The new keyboard commands allow you to alter the scope and position of your selection. They aid in selecting sections, jumping between sections, and changing the size of selection.
- Two keystrokes move the selection's left edge to the next marker (left or right)
- Two keystrokes move the selection's right edge to the next marker (left or right)
- Two keystrokes that expand the selection to the nearest surrounding markers. Two others reduce the selection to the nearest enclosed markers.
- Two keystrokes move the selection along the timeline (forwards or backwards).
NOTE: Before you can use the keyboard commands that adjust edges you must click somewhere in a song’s time line, or make a selection ... any selection. After you do so, you can adjust either edge of the selection. If you have no markers in your transcribe file, the new keystroke commands have no effect.

Transcribe Custom Keyboard Commands
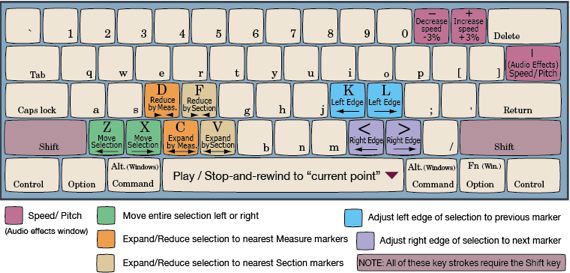
Click the keyboard image above for larger, clearer, and printable images. The following sections explains the various keystrokes. They are listed in the order of importance. I can navigate very quickly with just the Green and Gold keyboard commands.
Expand/Reduce both edges of the selection (the Gold C key)
Shift C moves both edges outward to the next markers (Expand)
Shift D moves the edges inward to the next markers (Reduce)
Move the selection (the Green keys)
Shift X moves the selection forward (to the right)
Shift Z moves the selection backwards (to the left)
Adjust the LEFT edge of the selection (the Blue keys)
Shift K moves the edge to the previous marker
Shift L moves the edge to the next marker
Adjust the RIGHT edge of the selection (the Lavender keys):
Shift < moves the edge to the previous marker
Shift > moves the edge to the next marker
Please remember, a selection is not moveable until you align its left and right edges are aligned to markers. To align edges:
- Open a Transcribe file
- Make a selection, any selection!
- Press Shift K and Shift > to align the edges of the selection to the nearest surrounding markers.
Then you can use Shift X and Shift Z to move the selection forward or back. You can also use Shift K and Shift > to expand or shrink the size of the selection (i.e. the number of measures.)
NOTE: The following point is of secondary importance, but worth mentioning.
You can use the blue and lavender keyboard commands in pairs, to move a selection forward or back, or to expand and reduce the selection's width. Here are those combinations:
To move the selection forward
(i.e. move both edges to the next marker)
Shift > Shift L
To move the selection backward
(i.e. move both edges to the previous marker)
Shift K Shift<
To expand the selection forward
Shift > Shift > ...
To expand the selection backward
Shift K Shift K ...
To expand the selection in both directions
Shift K Shift>
to reduce the selection from both sides
Shift L Shift<
Check back soon for Transcribe files, tutorials and resources.
Get Transcribe!
Try Transcribe for free ... or buy it now:
- Download a free 30 day trial of Transcribe
- Buy Transcribe now
- Read an overview of Transcribe's features (in the author's own words)
Transcribe should prove useful to anyone involved in language studies. With Transcribe you needn't limit your studies to professionally produced materials and programs. Just pop in a language study soundfile or CD and slow it down ... even listen to a foreign language radio broadcast.
Many professional language courses present you with slow, unnaturally articulate pronunciations. If you listen to normal speech with Transcribe, you'll hear the honest details of natural speech, but at a speed of your choice. This provides the opportunity to perceive the nuances of true speech. Best thing about studying language with Transcribe, you can add markers to identify various portions of the soundfile, and you can play these sections (or any selection) in loops.
If your language study materials are on cassette or vinyl, you'll need to convert them into a digital sound format (most commonly WAV, AIFF, or MP3); then you can use them directly, or burn them onto a CD . Whatever the case, bear in mind, it's perfectly legal to make a copy of materials that you've purchased, as long as it's for your own personal use.
TheoreticallyCorrect.com Home Page
Internal links: Sharing Transcribe Files